This is a method I used for reprogramming the programmer chip, an STM32F103C8T6, on an STM32VL-DISCOVERY board, to make the board more useful under Linux. I had two boards that had been reflashed several years ago with a Versaloon firmware, which was originally written for an external programming device that used the same programmer chip. Instructions for using OpenOCD and single-wire debug (SWD) with this combination did not work out-of-the-box with modern OpenOCD. When I queried residents of the #openocd IRC channel, they suggested trying the Black Magic Probe software instead. That's what I did. These instructions are almost wholely derived from other instructions found online. All credit is due to them, all errors (please correct them!) are mine.
Source material:
- This talks about putting Versaloon on the board from 2.5+ years ago: http://takenapart.com/?p=82
- This gives some sometimes ambiguous directions for a slightly different board, which can be confusing to follow: http://embdev.net/articles/STM_Discovery_as_Black_Magic_Probe
- The ST Micro resource page for the board: http://www.st.com/web/catalog/tools/FM116/SC959/SS1532/LN1199/PF250863
- The board schematics: http://www.st.com/st-web-ui/static/active/en/resource/technical/layouts_and_diagrams/schematic_pack/stm32vldiscovery_sch.zip (particularly MB913.pdf)
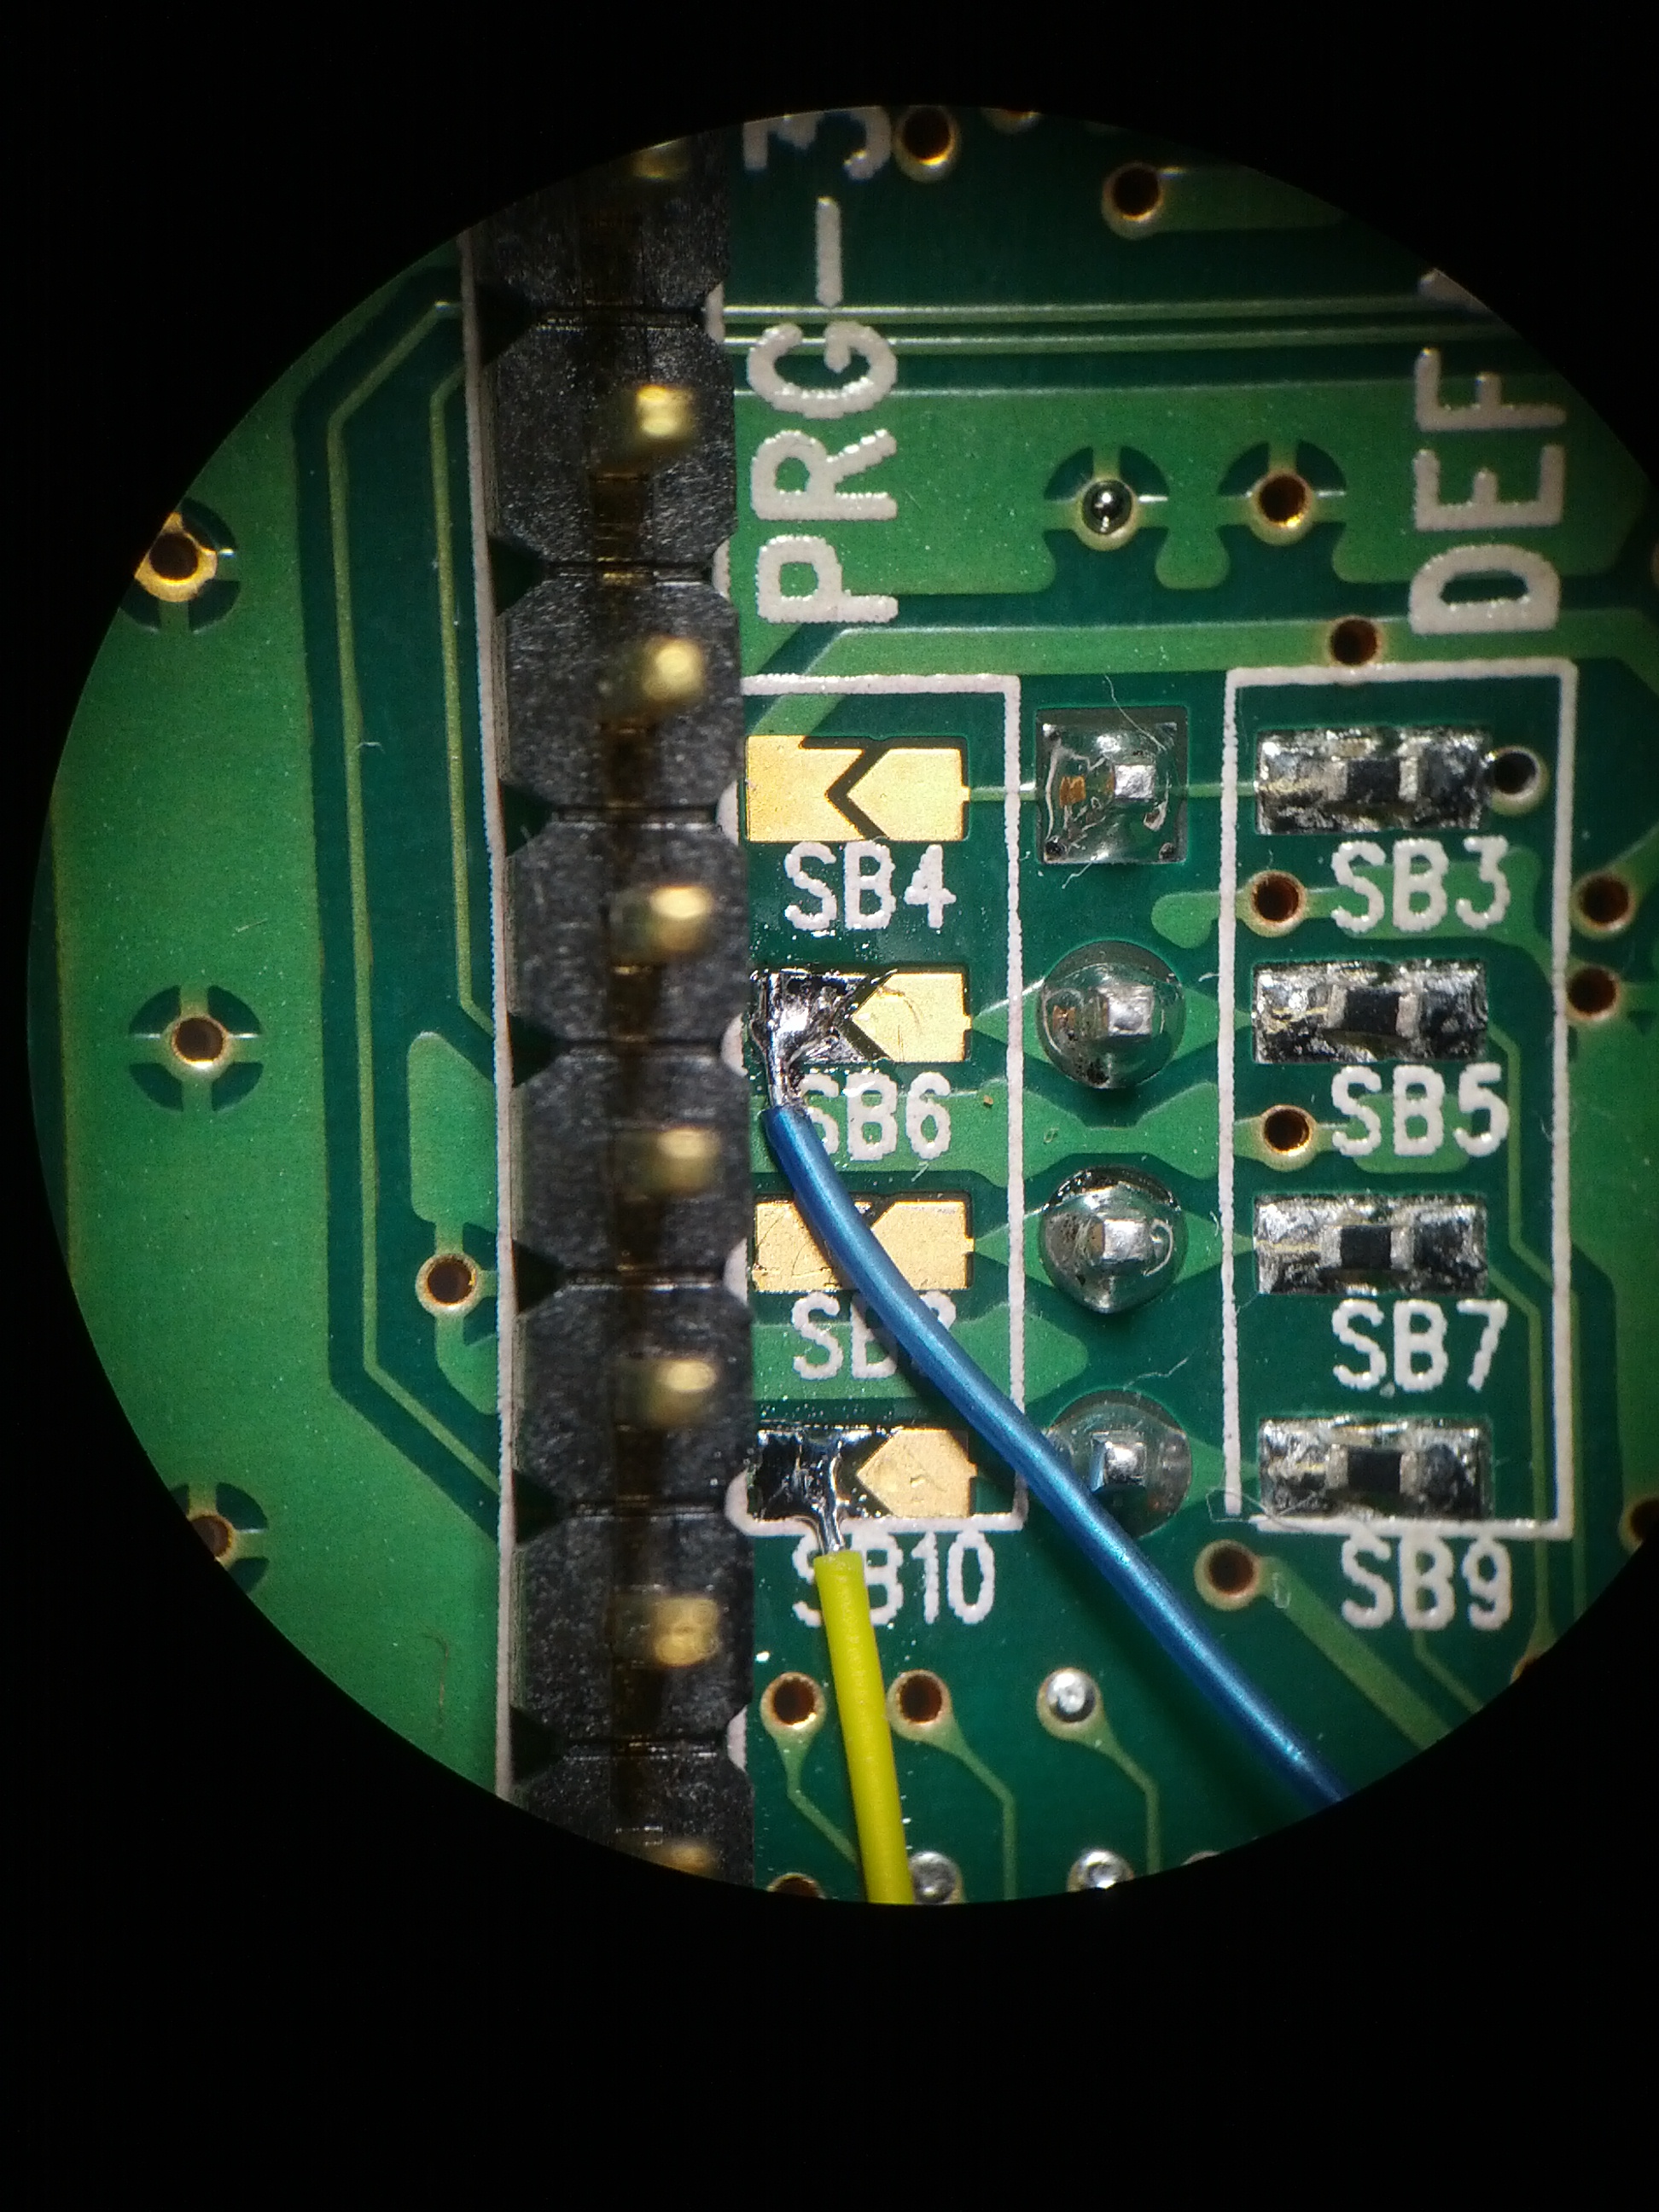
- The first problem is that the F103 chip does not connect its SWD pins to any easily accessible headers. It is therefore necessary to make a temporary hardware modification to get access to them. Here are "before" and "after" pictures (using a cell phone camera through a 10x stereo-dissecting microscope) of the attachments. The blue wire is connected to SWCLK (left side of SB6); the yellow wire is connected to SWDIO (left side of SB10). Don't let the solder bridges actually bridge.

- Obtain a cross compiling toolchain. I used the one from GCC ARM Embedded. In particular, I used the pre-built binaries from the Ubuntu PPA repository after I encountered a minor problem building my own toolchain from upstream sources. Call me lazy, but they worked.
- Clone the Black Magic Probe software from github and build for STLink:
- cd ~/src/
- git clone git://github.com/gsmcmullin/blackmagic.git
- cd blackmagic
- git submodule init
- git submodule update
- cd libopencm3
- make
- cd ..
- make PROBE_HOST=stlink
- Now, you need an already-working single-wire debugger to program the programmer chip. If you have an existing STLink/v2 device, like an STM32F3-DISCOVERY or STM32F4-DISCOVERY board, or an ST-LINK/V2 dongle, then you are set. For any STLink/v2 device, you can use the texane stlink software. I used an ST-LINK/V2 dongle, but the others should work about the same. Clone and build the software, if needed:
- cd ~/src
- git clone git://github.com/texane/stlink.git
- cd stlink
- ./autogen.sh
- ./configure
- make
- Wire up pins:
- Ground
- SWCLK
- SWDIO
- Target VCC (optional?) ... I hooked this to the 5V pin following my upstream sources, and that worked
- Try out st-util, to see if you are talking to something:
- $ ~/src/stlink/st-util -v
2013-11-10T00:38:54 INFO src/stlink-common.c: Loading device parameters....
2013-11-10T00:38:54 INFO src/stlink-common.c: Device connected is: F1 Medium-density device, id 0x20036410
2013-11-10T00:38:54 INFO src/stlink-common.c: SRAM size: 0x5000 bytes (20 KiB), Flash: 0x10000 bytes (64 KiB) in pages of 1024 bytes
Chip ID is 00000410, Core ID is 1ba01477.
Target voltage is 4642 mV.
Listening at *:4242... - <ctrl-C>
- $ ~/src/stlink/st-util -v
- Grab a copy of the existing flash image and look at the hexdump (the "Versaloon" string is pretty clear evidence we are talking to the right part, since Versaloon isn't likely to be anywhere else on the board):
- $ ~/src/stlink/st-flash read /tmp/orig.bin 0x8000000
2013-11-10T00:47:42 INFO src/stlink-common.c: Loading device parameters....
2013-11-10T00:47:42 INFO src/stlink-common.c: Device connected is: F1 Medium-density device, id 0x20036410
2013-11-10T00:47:42 INFO src/stlink-common.c: SRAM size: 0x5000 bytes (20 KiB), Flash: 0x10000 bytes (64 KiB) in pages of 1024 bytes
$ hexdump -C /tmp/orig.bin | tail
00004b00 b9 30 00 08 bb 30 00 08 c1 31 00 08 21 31 00 08 |.0...0...1..!1..|
00004b10 b5 31 00 08 a9 31 00 08 89 31 00 08 00 00 00 00 |.1...1...1......|
00004b20 08 00 00 00 05 01 00 00 15 1a 00 08 81 30 00 08 |.............0..|
00004b30 15 1a 00 08 15 1a 00 08 15 1a 00 08 a5 30 00 08 |.............0..|
00004b40 15 1a 00 08 15 1a 00 08 99 30 00 08 01 01 00 00 |.........0......|
00004b50 a4 49 00 08 56 65 72 73 61 6c 6f 6f 6e 28 30 78 |.I..Versaloon(0x|
00004b60 33 33 29 62 79 20 53 69 6d 6f 6e 28 63 6f 6d 70 |33)by Simon(comp|
00004b70 69 6c 65 64 20 6f 6e 20 4a 61 6e 20 31 32 20 32 |iled on Jan 12 2|
00004b80 30 31 31 29 00 00 00 00 |011)....|
00004b88
- $ ~/src/stlink/st-flash read /tmp/orig.bin 0x8000000
- Now, program the F103 with the Black Magic software you built earlier. There are two parts, the blackmagic_dfu.bin (bootloader) and blackmagic.bin. The blackmagic_dfu.bin gets written at 0x8000000, and blackmagic.bin gets written at 0x8002000. Once the bootloader part is on there, you have other options for flashing the blackmagic.bin payload, but hells-bells, you've got the programmer connected, you might as well use it!
- $ ~/src/stlink/st-flash erase
2013-11-10T00:55:13 INFO src/stlink-common.c: Loading device parameters....
2013-11-10T00:55:13 INFO src/stlink-common.c: Device connected is: F1 Medium-density device, id 0x20036410
2013-11-10T00:55:13 INFO src/stlink-common.c: SRAM size: 0x5000 bytes (20 KiB), Flash: 0x10000 bytes (64 KiB) in pages of 1024 bytes
Mass erasing
$ ~/src/stlink/st-flash write ~/src/blackmagic/src/blackmagic_dfu.bin 0x8000000
2013-11-10T00:56:20 INFO src/stlink-common.c: Loading device parameters....
2013-11-10T00:56:20 INFO src/stlink-common.c: Device connected is: F1 Medium-density device, id 0x20036410
2013-11-10T00:56:20 INFO src/stlink-common.c: SRAM size: 0x5000 bytes (20 KiB), Flash: 0x10000 bytes (64 KiB) in pages of 1024 bytes
2013-11-10T00:56:20 INFO src/stlink-common.c: Attempting to write 6720 (0x1a40) bytes to stm32 address: 134217728 (0x8000000)
Flash page at addr: 0x08001800 erased
2013-11-10T00:56:21 INFO src/stlink-common.c: Finished erasing 7 pages of 1024 (0x400) bytes
2013-11-10T00:56:21 INFO src/stlink-common.c: Starting Flash write for VL/F0 core id
2013-11-10T00:56:21 INFO src/stlink-common.c: Successfully loaded flash loader in sram
6/6 pages written
2013-11-10T00:56:21 INFO src/stlink-common.c: Starting verification of write complete
2013-11-10T00:56:21 INFO src/stlink-common.c: Flash written and verified! jolly good!
$ ~/src/stlink/st-flash write ~/src/blackmagic/src/blackmagic.bin 0x8002000
2013-11-10T00:57:35 INFO src/stlink-common.c: Loading device parameters....
2013-11-10T00:57:35 INFO src/stlink-common.c: Device connected is: F1 Medium-density device, id 0x20036410
2013-11-10T00:57:35 INFO src/stlink-common.c: SRAM size: 0x5000 bytes (20 KiB), Flash: 0x10000 bytes (64 KiB) in pages of 1024 bytes
2013-11-10T00:57:35 INFO src/stlink-common.c: Attempting to write 51144 (0xc7c8) bytes to stm32 address: 134225920 (0x8002000)
Flash page at addr: 0x0800e400 erased
2013-11-10T00:57:37 INFO src/stlink-common.c: Finished erasing 50 pages of 1024 (0x400) bytes
2013-11-10T00:57:37 INFO src/stlink-common.c: Starting Flash write for VL/F0 core id
2013-11-10T00:57:37 INFO src/stlink-common.c: Successfully loaded flash loader in sram
49/49 pages written
2013-11-10T00:57:41 INFO src/stlink-common.c: Starting verification of write complete
2013-11-10T00:57:42 INFO src/stlink-common.c: Flash written and verified! jolly good!
- $ ~/src/stlink/st-flash erase
- Disconnect the SWD programmer from the board, and disconnect/reconnect, you should see something like this in dmesg:
- [443492.652066] usb 2-2: new full-speed USB device number 37 using uhci_hcd
[443492.833056] usb 2-2: New USB device found, idVendor=1d50, idProduct=6018
[443492.833062] usb 2-2: New USB device strings: Mfr=1, Product=2, SerialNumber=3
[443492.833065] usb 2-2: Product: Black Magic Probe (STLINK), (Firmware 1.5-00215-g42570ef, build 20131110)
[443492.833069] usb 2-2: Manufacturer: Black Sphere Technologies
[443492.833071] usb 2-2: SerialNumber: BDD396D7
[443492.839100] cdc_acm 2-2:1.0: This device cannot do calls on its own. It is not a modem.
[443492.839134] cdc_acm 2-2:1.0: ttyACM1: USB ACM device
[443492.843105] cdc_acm 2-2:1.2: This device cannot do calls on its own. It is not a modem.
[443492.843141] cdc_acm 2-2:1.2: ttyACM2: USB ACM device
- [443492.652066] usb 2-2: new full-speed USB device number 37 using uhci_hcd
- Now, start your cross-gdb (note, previously I was getting /dev/ttyACM0 and /dev/ttyACM1; the first one listed in dmesg is the one to use for gdb, so /dev/ttyACM1 here... pay attention!):
- $ arm-none-eabi-gdb
- GNU gdb (GNU Tools for ARM Embedded Processors) 7.4.1.20130913-cvs
Copyright (C) 2012 Free Software Foundation, Inc.
License GPLv3+: GNU GPL version 3 or later <http://gnu.org/licenses/gpl.html>
This is free software: you are free to change and redistribute it.
There is NO WARRANTY, to the extent permitted by law. Type "show copying"
and "show warranty" for details.
This GDB was configured as "--host=i686-pc-linux-gnu --target=arm-none-eabi".
For bug reporting instructions, please see:
<http://www.gnu.org/software/gdb/bugs/>.
(gdb) target extended-remote /dev/ttyACM1
Remote debugging using /dev/ttyACM1
(gdb) mon swdp_scan
Target voltage: unknown
Available Targets:
No. Att Driver
1 STM32, Medium density.
(gdb) attach 1
Attached to Remote target
0x080001b6 in ?? ()
- To program the main CPU, the STM32F100RBT6B, just "load" your .elf file!
- (gdb) load ~/src/stm32/an3268/stm32vldiscovery_package/Project/Examples/GPIOToggle/GPIOToggle.elf
Loading section .isr_vector, size 0x1d0 lma 0x8000000
Loading section .text, size 0xfa4 lma 0x80001d0
Loading section .data, size 0x34 lma 0x8001174
Start address 0x8001101, load size 4520
Transfer rate: 14 KB/sec, 645 bytes/write.
(gdb) file ~/src/stm32/an3268/stm32vldiscovery_package/Project/Examples/GPIOToggle/GPIOToggle.elf
A program is being debugged already.
Are you sure you want to change the file? (y or n) y
Reading symbols from /home/russell/src/stm32/an3268/stm32vldiscovery_package/Project/Examples/GPIOToggle/GPIOToggle.elf...done.
(gdb) run
The program being debugged has been started already.
Start it from the beginning? (y or n) y
Starting program: /home/russell/src/stm32/an3268/stm32vldiscovery_package/Project/Examples/GPIOToggle/GPIOToggle.elf
- (gdb) load ~/src/stm32/an3268/stm32vldiscovery_package/Project/Examples/GPIOToggle/GPIOToggle.elf
- Celebrate by desoldering the wires you so carefully tacked down on the solder bridge pads back at step 1. You can flash an updated blackmagic.bin using the bootloader code. You enter the bootloader by holding the black reset (RST) button as you plug in the USB cable. Check dmesg, you should see something like this, note "(Upgrade)":
- [445094.960058] usb 2-2: new full-speed USB device number 44 using uhci_hcd
[445095.193080] usb 2-2: New USB device found, idVendor=1d50, idProduct=6017
[445095.193087] usb 2-2: New USB device strings: Mfr=1, Product=2, SerialNumber=3
[445095.193090] usb 2-2: Product: Black Magic (Upgrade) for STLink/Discovery, (Firmware 1.5-00215-g42570ef, build 20131110)
[445095.193094] usb 2-2: Manufacturer: Black Sphere Technologies
[445095.193096] usb 2-2: SerialNumber: BDD396D7
- [445094.960058] usb 2-2: new full-speed USB device number 44 using uhci_hcd
- In the "Upgrade" mode, you can update blackmagic.bin using dfu-utils from git://gitorious.org/dfu-util/dfu-util.git
- $ cd ~/src
- $ git clone git://gitorious.org/dfu-util/dfu-util.git
- $ cd dfu-util
- $ ./autogen.sh
- $ ./configure
- $ make
- You need to add a dfu suffix to the file, so do that, maybe to a copy:
- $ cp ~/src/blackmagic/src/blackmagic.bin /tmp/blackmagic.bin
- $ ~src/dfu-util/src/dfu-suffix -a /tmp/blackmagic.bin
- dfu-suffix (dfu-util) 0.7
(C) 2011-2012 Stefan Schmidt
This program is Free Software and has ABSOLUTELY NO WARRANTY
Please report bugs to dfu-util@lists.gnumonks.org
Suffix successfully added to file
$ sudo ~/src/dfu-util/src/dfu-util -v -D /tmp/blackmagic.bin
dfu-util 0.7
Copyright 2005-2008 Weston Schmidt, Harald Welte and OpenMoko Inc.
Copyright 2010-2012 Tormod Volden and Stefan Schmidt
This program is Free Software and has ABSOLUTELY NO WARRANTY
Please report bugs to dfu-util@lists.gnumonks.org
DFU suffix version 100
Opening DFU capable USB device...
ID 1d50:6017
Run-time device DFU version 011a
Claiming USB DFU Interface...
Setting Alternate Setting #0 ...
Determining device status: state = dfuIDLE, status = 0
dfuIDLE, continuing
DFU mode device DFU version 011a
Device returned transfer size 1024
DfuSe interface name: "Internal Flash "
Memory segment at 0x08000000 8 x 1024 = 8192 (r)
Memory segment at 0x08002000 56 x 1024 = 57344 (rew)
dfu-util: Only DfuSe file version 1.1a is supported
- Celebrate!