It tooks some tries, but I think I'm doing pretty well at etching now.
Step 1 - Design the board in Eagle.
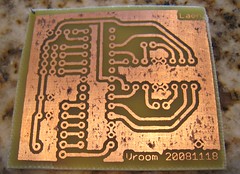
This was probably the most time consuming part for me, since I spent a lot of time trying to "get it right". Trying to make a board single sided can be a lot of work. Making a ground plane (drawing a polygon and naming it "GND") helps. Making fat traces (24mils) is pretty much required for a beginner like me. Also, having really wide clearances (again, 24mils) helps, though it makes it even harder to make things single sided, since that means no wires going between IC pads.
Step 2 - Print it.
I had bought some expensive toner transfer paper, and had pretty good success with it, but this time I just used magazine paper. It's cheap paper, so it has really tiny fibers. That makes it easy to remove from the board. The toner transfers off of it _really_ well.
It has to be a laser printer, since toner is a plastic that can be transfered to copper and ink is just, well.. ink.
Step 3 - Prepare the copper clad
I have 6"x11" 1/2oz copper clad board. That's too big for my 6"x6" Tupperware etching tank, so I cut it down to size using "Aviation tin snips". They're an $18 pair of scissors for cutting metal. It's still hard to cut the board, but at least it's possible with this stuff. I was tempted at first to just use my Dremel to saw through it, but I've heard that fiberglass dust is carcinogenic if you breathe it, so I want to make as little of it as possible.
I made my boards large enough to fit several copies of my design on it, just so I'd have redundant boards in case some didn't make it through to the end of the process.
I cleaned the entire thing with soap and water, scrubbing it down _hard_ with scotchbright. This gets fingerprints off of it, and gives the toner something to sink into when you transfer it over.
Step 4 - Transfer the print onto the copper clad.
First I tried to use a laminator, but I wasn't getting very good transfers. Many of my traces would come off during etching. This time I just used a cheap-o clothes iron. I ironed the hell out of it for probably 5 minutes, until the toner was practically soaking into the paper. This was probably too much, but it worked.
Be sure that it _all_ gets ironed, even the corners. I lost two of the nine copies, and they were both corner pieces.
Then I dumped it into a bucket of water, gave it a few minutes, and pulled off as much of the paper as possible. The remainder I removed with a tooth brush. You can be somewhat rough here. If the toner is transfered, then it's stuck hard to the board.
Step 5 - Etch it!
I used a muriatic acid and hydrogen peroxide etch. It's good stuff, and nearly infinitely reusable (I hear). The fumes kind of suck, so I etched outside. My mix was 2 parts hydrogen peroxide + 1 part muriatic acid as this seems to be the consensus online. I hear it's important to always add the acid to the peroxide, and never the other way around. Oh, and I always wear rubber dishwashing gloves when the acid is out.
I made enough etchant to cover the board with about an inch and a half, then heated it up to near boiling. That's not strictly necessary; I've heard of people etching with this stuff at room temperature, but it really speeds things along when it's hot. The etchant is clear at first, but turns windex blue then green as it eats copper. I kept the board moving in the etchant (both side to side and up and down, so the bottom would get etched well too).
It seems like nothing is happening until the last couple of minutes, then it all happens at once.
When I couldn't see any more copper for it to etch, I pulled the board out of the mix and dumped it into a bucket of water I had ready.
Step 6 - Clean it, cut it and drill it.
At this point, I have a bunch of etched boards, still covered with protective toner. Acetone (nail polish remover) removes that. Standard practice seems to be to remove _all_ the toner (and that's certainly what I did this time), but I wonder if
one could just remove the toner around the solder points. The toner would then serve as a little bit of an insulator if you were putting the board in a metal enclosure.
With the aviation tin snips, I cut out my individual boards from the large etched board.
To drill my boards, I used a Dremel tool drill press stand and some micro carbide drill bits from Harbor Freight. A number 58 drill bit seems to be a pretty good size for making holes that component leads can easily fit through.
Once again, careful of the dust, as rumors on the Internets says it's carcinogenic. I just made it a habit to exhale/blow at the drill bit when drilling and inhale between drillings. This is really producing more large shavings than dust, but better safe than sorry.
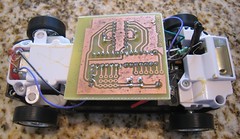
Step 7 - Soldering it.
Since I gave myself such large clearances in Step 1, I didn't have to do anything special to solder the boards. I did have a bottle of water soluble flux handy, just in case I was having problems, but I didn't need them.